
I have been working on making an extension to PHP to read data (Mavlink messages) from a serial port on a Windows machine. PHP on windows doesn’t seem to provide a good API to open and read data from a serial port, though there is an API for Linux. For example, according to the PHP docs, the function to set the baud rate for a serial port is not available on windows:
http://php.net/manual/en/function.dio-tcsetattr.php
For this and some other reasons, I needed to write a “php extension”, which is on windows is a dll that is loaded by php and provides the needed functionality. I have never written an extension for php (I’m new to web programming in general), but I’ve written a lot of Lua – C++ and C# – C++ bindings, so I’m familiar with how bindings from native – scripting languages work in general.
I just finished writing a simple extension that exports a trivial function (multiplies a number passed as input by 2 and outputs the result) and discovered a number of gotchas that took me a few hours to resolve. I’ll list those in this post and hopefully this info will save someone else trying to do the same thing some time.
This post provides a great deal of information about how to get set up:
So read this first. As mentioned in this post, you don’t need to rebuild your entire PHP distribution to make an extension. However you do need to download the php source corresponding to the php version you have installed. One way to find your version of php is to run phpinfo. The phpinfo.php will be located somewhere in your webserver/php installation, just do a file search for it if you don’t know where it is located. You should get a page that looks like this:
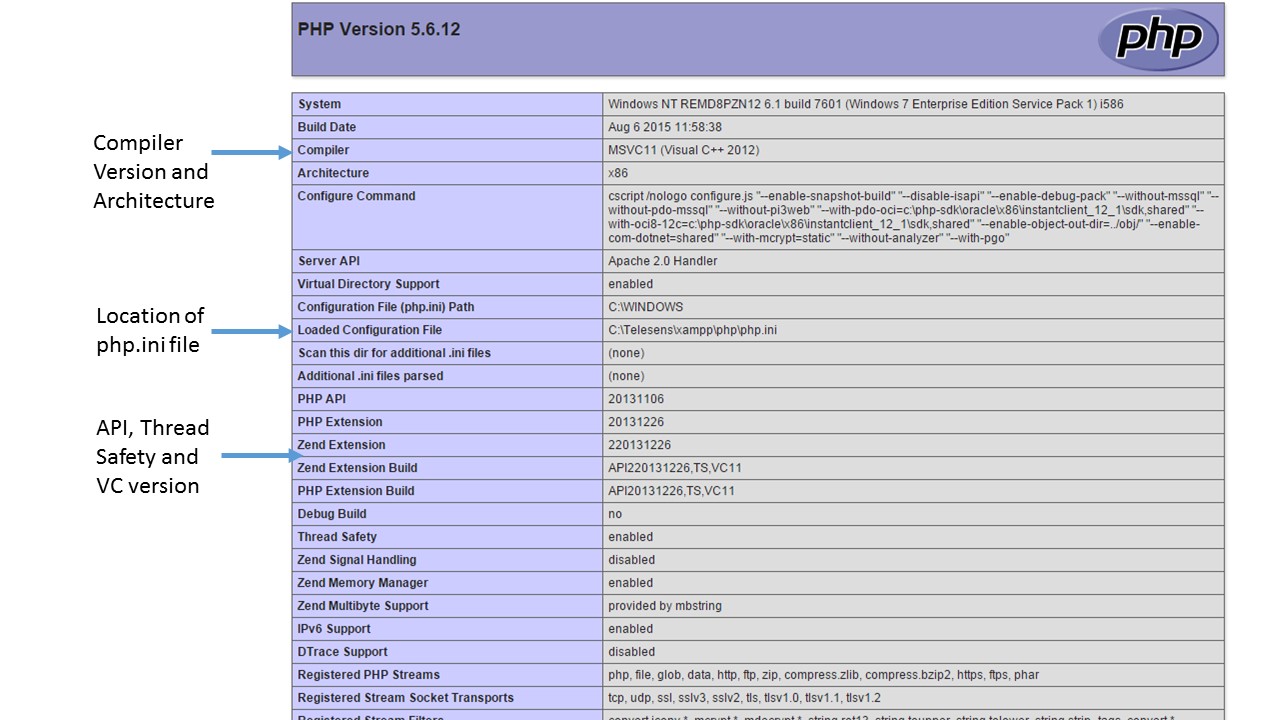
Pay attention to the following:
- PHP Version: 5.6.12. You must download the php source distribution corresponding to the version you have installed. PHP source code for version 5.6.12 is available here: https://github.com/php/php-src/tree/PHP-5.6.12. Choose the branch corresponding to your PHP version.
- Compiler Version and Architecture: This tells us what version of Visual C++ and what architecture was used to build your PHP distribution. We must use the corresponding settings to build our extension. For example, for PHP version 5.6.12 was compiled with MSVC11, so Visual Studio 2012 is a safe choice to use to build our extension.
- Location of php.ini : We’ll be modifying this file to add our extension so PHP can discover it, so good to note the location of this file.
- API, Thread Safety and VC Version: I’m not sure what the API corresponds to. If someone knows, please let me know. TS stands for thread safety (enabled in this case), and VC is the compiler version again.
Now go ahead and make a source file that declares and defines your function using the ZEND API as described in the earlier post. Use the correct version of Visual Studio (2012 in this case). For the C++ preprocessor setting, make sure to specify PHP_WIN32;ZEND_DEBUG=0;ZTS=1;ZEND_WIN32. ZTS corresponds to the TS in the output shown above, so we set it to 1.
Important: at the beginning of your source file, add :#define PHP_COMPILER_ID “VC11”. The VC11 should be replaced with the version appropriate in your case. If you don’t do this, PHP will think there is a compiler mismatch (even though you are actually using the correct compiler) and PHP won’t load your dll!
Compile your project to a dll, which should be copied to php\ext directory. It it good practice to prepend your dll with a php_ though I don’t think this is necessary.
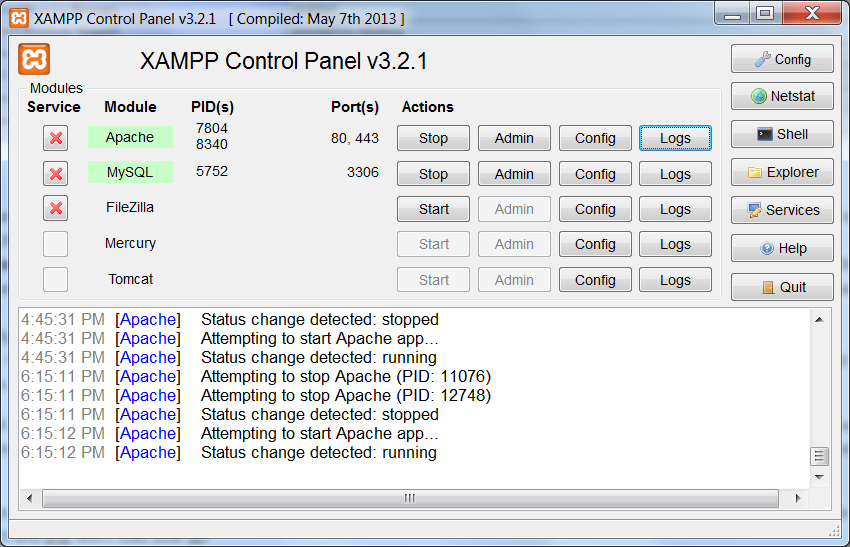
Next, we need to tell PHP about our extension. This can be done my modifying the ‘Dynamic Extension’ section in your php.ini file in the following way: extension=my_ext.dll. Now save the file and restart your web server. Launch php info again. You should see your module in the “additional modules” section. If you don’t see your module here, open your webserver logs. If you are using a XAMPP installation, this can be done by pushing the logs button for the webserver.
In the log file, you should see why PHP failed to load your extension. For example, before I set the PHP_COMPILER_ID define, the logs contained the following:
[09-Feb-2016 21:42:02 UTC] PHP Warning: PHP Startup: CustomExt Module: Unable to initialize module
Module compiled with build ID=API20131226,TS
PHP compiled with build ID=API20131226,TS,VC11
This made it clear that the problem was that PHP didn’t think I was using the right compiler version (even though I was). Setting the PHP_COMPILER_ID fixed the problem! Hope this will help others dealing with the same problem.
Leave a Reply