

Over the past few months, I’ve been learning how to build ML pipelines consisting of containerized micro services. A common task in such pipelines is to send data over a message queue to be stored in a database. The message queue insulates the data producer from the latency and delays associated with writing data to the database by introducing a layer of indirection. Message queues also provide a level of fault tolerance to data loss because of the unavailability of the database server by caching messages that couldn’t be stored. I may cover message queues in another post. In this post, I’ll focus on running a MongoDB database as a containerized application on a AWS EC2 compute instance that uses an attached EBS volume as the data store. Running Mongo in a container makes it easy to deploy it on any compute instance that supports containers and using an attached EBS volume to store data makes it easy to migrate data and increase the size of the data store if more capacity is needed.
The main steps in the process are:
- Creating an EBS volume
- Attaching it to an EC2 compute instance as a mounted disk
- Installing and running MongoDB in a container and configuring it to use the mounted EBS volume as the datastore.
While instructions for all these steps are described in various technical documentation, blog posts and stackoverflow question, it still took me a while to set all of this up. Therefore, I thought it would be helpful to write an article that consolidates all the info already available with my contributions. Let’s go through these steps in detail.
Creating an EBS volume:
The steps to create an EBS volume on AWS are described in detail here. I’ll outline some points I found a bit tricky.
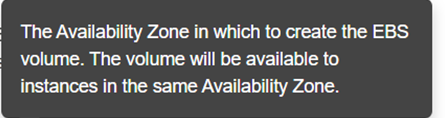
- Availability Zone: The EBS volume will be available only to instances in the same availability zone, so choose the same availability zone as the one your database instances are located.
- GiB vs. GB: GiB:
 , GB:
, GB: 
- MiB vs. MB: MiB:
 , MB:
, MB: 
- IOPS: Input/Output Operations per second
- Throughput: Number of bytes read or written per second. Throughput = IOPS
 bytes/IO operation. See this stackoverflow post for more details.
EBS volume types
AWS documentation provides detailed information about EBS volume types, but the information is scattered across many pages. In the table below, I’ll consolidate all relevant information. As the table shows, the general purpose SSD should suffice for most applications. For more pricing information and examples, see this and for more details about EBS volumes, see this. I recommend just picking the general purpose SSD and following the rest of the instructions. Once you have everything working, you can experiment with different EBS volumes.
| Volume Type | Description | Min/Max (GiB) | Cost | Description |
|---|---|---|---|---|
| General Purpose SSD | Baseline performance is 3 IOPS per GiB, with a minimum of 100 IOPS and a maximum of 10000 IOPS. This means if you provision 10 GiB, you’ll get at least 100 IOPS. If you provision 100 GiB, you’ll get at least 300 IOPS. General Purpose (SSD) volumes under 1000 GiB can burst up to 3000 IOPS. 1 I/O: 16 KiB. Maximum IOPS/Volume = 16,000. @16 KiB per I/O, maximum throughput = 250 MiB/sec (~ ) )
You are unable to provision a specific IOPS performance. For that you need Provisioned IOPS.
|
1 – 16384 | $0.10 per GB-month of provisioned storage | General purpose SSD volume that balances price and performance for a wide variety of workloads |
| Provisioned IOPS | Provisioned IOPS allow you to provision a specific IOPS performance. There are two relevant settings with Provisioned IOPS. The amount of storage and the IOPS performance. The maximum IOPS performance you can provision depends on the amount of storage requested. you can provision up to 50 IOPS per GiB with a maximum of 20000 IOPS. You pay for both the storage and the provisioned IOPS (see the cost column). 1 I/O: 16 KiB. Maximum IOPS/Volume = 64,000. @16 KiB per I/O, maximum throughput =1000 MiB/sec (~ ) ) |
4 – 16384 | $0.125 per GB-month of provisioned storage AND \$0.065 per provisioned IOPS-month | Highest-performance SSD volume for mission-critical low-latency or high-throughput workloads |
| Cold HDD | Maximum IOPS/Volume = 500. @1 MiB per I/O, maximum throughput = 500 MiB/sec | 500 – 16384 | $0.045 per GB-month of provisioned storage | Low-cost HDD volume designed for frequently accessed, throughput-intensive workloads |
| Throughput Optimized HDD | Maximum IOPS/Volume = 250. @1 MiB per I/O, maximum throughput = 250 MiB/sec | 500 – 16384 | $0.025 per GB-month of provisioned storage | Lowest cost HDD volume designed for less frequently accessed workloads |
| Magnetic | N/A | 1 – 1024 | N/A | N/A |
Attaching an EBS volume to an instance
Now you have created the EBS volume, next step is to attach it to your EC2 instance. The steps to create an EC2 instance are listed here. It is a good idea to attach an appropriate tag to your instance so you know that it is a database instance. For example, I use the key-value pair (instance-type, db-node) for my EC2 database instance. When your instance is up and running, it will need to be able to access EC2 and S3 AWS services to finish the steps outlined below. This access can be provided in two ways:
- You can create an IAM user with the appropriate access and then SSH into your instance and use aws configure to configure the settings (AccessKey and SecretAccessKey) that AWS Command Line Interface (CLI) uses to interact with AWS.
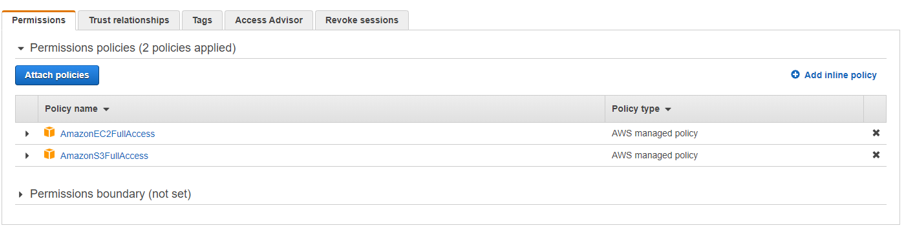
- A better approach is to create an IAM Role and attach the AmazonEC2FullAccess and AmazonEC2S3FullAccess policies. You can then specify this role when creating your EC2 instance. This way your instance will launch with the required access to AWS services and no further configuration steps are needed. For better security, you could create a targeted policy that provides access to the specific resources (eg. a specific S3 bucket) you need. Later in this article, we’ll see why access to S3 is needed.

Make sure to launch your instance in the same VPC as where you created the EBS volume. The VPC can be specified in Step 3: Configure Instance Detail while launching your EC2 instance. MongoDB listens on port 27017 by default. To make your instance accessible over this port, you should either open this port on your default security group or create a new security group with access to this port (which I would recommend). Instructions on creating a new security group are here.
Once your instance is up and running, SSH into your instance and run the following bash script. Each step is commented in detail. These instructions assume that Ubuntu Bionic 18.04 OS is installed on your EC2 instance. These instructions install aws-cli, attach the EBS volume you just created and maps the directory /mongo-data to the attached EBS volume
|
1 2 3 4 5 6 7 8 9 10 11 12 13 14 15 16 17 18 19 20 21 22 23 24 25 26 27 28 29 30 31 32 33 34 35 36 37 38 39 40 41 |
#!/bin/bash mkdir -p ~/dev/apps/myApp cd ~/dev/apps/myApp # install zip/unzip so we can install aws cli sudo apt install unzip sudo apt install zip # Download and install aws command line interface (CLI) curl "https://d1vvhvl2y92vvt.cloudfront.net/awscli-exe-linux-x86_64.zip" -o "awscliv2.zip" unzip awscliv2.zip sudo ./aws/install # Get the instance Id of this instance and attach the EBS volume # This is a common technique used to get the instanceID of your instance instanceId=$(curl -s http://169.254.169.254/latest/meta-data/instance-id) # your EBS volume Id. EBSVolumeId=vol-12345678 Region=us-east-1 # Note that the device name can't be arbitrary. It must follow naming conventions. See # https://docs.aws.amazon.com/AWSEC2/latest/UserGuide/device_naming.html for details aws2 ec2 attach-volume --volume-id $EBSVolumeId --instance-id $instanceId --device /dev/sdf --region $Region # create a directory that will be mapped to the EBS volume and mount it sudo mkdir /mongo-data # If this is the first time you are using the EBS volume, it will not have a file system. Use the steps # below to create a file system # First to check if a file system has already been created, use this: # sudo file -s /dev/xvdf # In the command above, note that while we used /dev/sdf in the attach-volume command, we need to check # /dev/xvdf. Not sure why this is.. # if the output of the command above is: "/dev/xvdf: data", then a file system has not been created. # Create a file system using the following command # sudo mkfs -t xfs /dev/xvdf # Assuming a file system has been created, lets mount it to the directory we create above. sudo mount /dev/xvdf /mongo-data # you can check if the volume has been mounted properly using df -h. The size of the mounted directory should # match the size of the EBS volume |
Installing MongoDB and running it as a containerized application
The final step is to install and run MongoDB as a containerized application and opening the port it listens on to the internet so the rest of your application can communicate with it. First, we need a Dockerfile that builds our MongoDB image.
|
1 2 3 4 5 6 7 8 9 10 11 12 13 14 15 16 17 18 19 20 21 22 23 24 25 26 27 28 29 30 31 32 33 34 35 36 37 38 39 40 41 42 43 44 45 46 47 48 49 50 51 52 53 54 55 56 57 58 59 60 61 62 63 64 65 66 67 68 69 70 71 72 73 74 75 76 77 78 79 80 81 82 83 84 85 86 87 88 89 90 91 92 93 94 95 96 97 98 99 100 101 102 103 104 105 106 107 |
FROM ubuntu:bionic # add our user and group first to make sure their IDs get assigned consistently, regardless of whatever dependencies get added RUN groupadd -r mongodb && useradd -r -g mongodb mongodb RUN set -eux; \ apt-get update; \ apt-get install -y --no-install-recommends \ ca-certificates \ jq \ numactl \ ; \ if ! command -v ps > /dev/null; then \ apt-get install -y --no-install-recommends procps; \ fi; \ rm -rf /var/lib/apt/lists/* # grab gosu for easy step-down from root (https://github.com/tianon/gosu/releases) ENV GOSU_VERSION 1.11 # grab "js-yaml" for parsing mongod's YAML config files (https://github.com/nodeca/js-yaml/releases) ENV JSYAML_VERSION 3.13.0 RUN set -ex; \ \ savedAptMark="$(apt-mark showmanual)"; \ apt-get update; \ apt-get install -y --no-install-recommends \ wget \ ; \ if ! command -v gpg > /dev/null; then \ apt-get install -y --no-install-recommends gnupg dirmngr; \ savedAptMark="$savedAptMark gnupg dirmngr"; \ elif gpg --version | grep -q '^gpg (GnuPG) 1\.'; then \ # "This package provides support for HKPS keyservers." (GnuPG 1.x only) apt-get install -y --no-install-recommends gnupg-curl; \ fi; \ rm -rf /var/lib/apt/lists/*; \ \ dpkgArch="$(dpkg --print-architecture | awk -F- '{ print $NF }')"; \ wget -O /usr/local/bin/gosu "https://github.com/tianon/gosu/releases/download/$GOSU_VERSION/gosu-$dpkgArch"; \ wget -O /usr/local/bin/gosu.asc "https://github.com/tianon/gosu/releases/download/$GOSU_VERSION/gosu-$dpkgArch.asc"; \ export GNUPGHOME="$(mktemp -d)"; \ gpg --batch --keyserver hkps://keys.openpgp.org --recv-keys B42F6819007F00F88E364FD4036A9C25BF357DD4; \ gpg --batch --verify /usr/local/bin/gosu.asc /usr/local/bin/gosu; \ command -v gpgconf && gpgconf --kill all || :; \ rm -r "$GNUPGHOME" /usr/local/bin/gosu.asc; \ chmod +x /usr/local/bin/gosu; \ gosu --version; \ gosu nobody true; \ \ wget -O /js-yaml.js "https://github.com/nodeca/js-yaml/raw/${JSYAML_VERSION}/dist/js-yaml.js"; \ # TODO some sort of download verification here \ apt-mark auto '.*' > /dev/null; \ apt-mark manual $savedAptMark > /dev/null; \ apt-get purge -y --auto-remove -o APT::AutoRemove::RecommendsImportant=false RUN mkdir /docker-entrypoint-initdb.d ENV GPG_KEYS E162F504A20CDF15827F718D4B7C549A058F8B6B RUN set -ex; \ export GNUPGHOME="$(mktemp -d)"; \ for key in $GPG_KEYS; do \ gpg --batch --keyserver ha.pool.sks-keyservers.net --recv-keys "$key"; \ done; \ gpg --batch --export $GPG_KEYS > /etc/apt/trusted.gpg.d/mongodb.gpg; \ command -v gpgconf && gpgconf --kill all || :; \ rm -r "$GNUPGHOME"; \ apt-key list # Allow build-time overrides (eg. to build image with MongoDB Enterprise version) # Options for MONGO_PACKAGE: mongodb-org OR mongodb-enterprise # Options for MONGO_REPO: repo.mongodb.org OR repo.mongodb.com # Example: docker build --build-arg MONGO_PACKAGE=mongodb-enterprise --build-arg MONGO_REPO=repo.mongodb.com . ARG MONGO_PACKAGE=mongodb-org ARG MONGO_REPO=repo.mongodb.org ENV MONGO_PACKAGE=${MONGO_PACKAGE} MONGO_REPO=${MONGO_REPO} ENV MONGO_MAJOR 4.2 ENV MONGO_VERSION 4.2.1 # bashbrew-architectures:amd64 arm64v8 s390x RUN echo "deb http://$MONGO_REPO/apt/ubuntu bionic/${MONGO_PACKAGE%-unstable}/$MONGO_MAJOR multiverse" | tee "/etc/apt/sources.list.d/${MONGO_PACKAGE%-unstable}.list" RUN set -x \ && apt-get update \ && apt-get install -y \ ${MONGO_PACKAGE}=$MONGO_VERSION \ ${MONGO_PACKAGE}-server=$MONGO_VERSION \ ${MONGO_PACKAGE}-shell=$MONGO_VERSION \ ${MONGO_PACKAGE}-mongos=$MONGO_VERSION \ ${MONGO_PACKAGE}-tools=$MONGO_VERSION \ && rm -rf /var/lib/apt/lists/* \ && rm -rf /var/lib/mongodb \ && mv /etc/mongod.conf /etc/mongod.conf.orig RUN mkdir -p /data/db /data/configdb \ && chown -R mongodb:mongodb /data/db /data/configdb VOLUME /data/db /data/configdb COPY docker-entrypoint.sh /usr/local/bin/ RUN chmod 777 /usr/local/bin/docker-entrypoint.sh \ && ln -s /usr/local/bin/docker-entrypoint.sh / ENTRYPOINT ["docker-entrypoint.sh"] EXPOSE 27017 CMD ["mongod"] |
This file builds MongoDB version 4.2. For another version, use the official Mongo docker-library
Few things to note about this file:
- It copies docker-entrypoint.sh to /usr/local/bin and uses the script as the docker container entrypoint. You can find this file in the official Mongo docker-library listed above. Make sure the user docker runs as has read/write permission to this file, otherwise it may not be able to copy it inside the container image. The entrypoint file sets up a number of things:
- It uses the MONGO_INITDB_ROOT_USERNAME and MONGO_INITDB_ROOT_PASSWORD environment variables to set up a root user and run mongo using –auth (in authorization mode). This mode enables authorization so that clients that connect to the mongodb instance must authenticate themselves as a MongoDB user and can only perform actions as determined by their assigned roles. See this for more details about mongodb access controls. Here’s the relevant snippet from docker-entrypoint.sh:
12345if [ "$MONGO_INITDB_ROOT_USERNAME" ] && [ "$MONGO_INITDB_ROOT_PASSWORD" ]; then# if we have a username/password, let's set "--auth"_mongod_hack_ensure_arg '--auth' "$@"set -- "${mongodHackedArgs[@]}"shouldPerformInitdb='true'
You can set the MONGO_INITDB_ROOT_USERNAME and MONGO_INITDB_ROOT_PASSWORD either using the –env option in docker run or in a docker-compose.yml file. I used a docker-compose.yml file and the contents are shown below. - If shouldPerformInitdb is set (see code snippet above), it loops over all the .js and .sh files in the docker-entrypoint-initdb.d directory inside your container and executes them in a mongo shell. You can use this mechanism to perform any other initialization actions. I use this mechanism to run a .js file that creates an admin user that has access to my databases. This file is also shown below.
1234567891011if [ -z "$shouldPerformInitdb" ]; then# if we've got any /docker-entrypoint-initdb.d/* files to parse later, we should initdbfor f in /docker-entrypoint-initdb.d/*; docase "$f" in*.sh|*.js) # this should match the set of files we check for belowshouldPerformInitdb="$f"break;;esacdonefi
- It uses the MONGO_INITDB_ROOT_USERNAME and MONGO_INITDB_ROOT_PASSWORD environment variables to set up a root user and run mongo using –auth (in authorization mode). This mode enables authorization so that clients that connect to the mongodb instance must authenticate themselves as a MongoDB user and can only perform actions as determined by their assigned roles. See this for more details about mongodb access controls. Here’s the relevant snippet from docker-entrypoint.sh:
- Exposes port 27017 and runs mongod so when you run your container, mongod will be running and accepting connections on port 27017.
With that said, here is the content of mongo-init.js and docker-compose.yml files.
|
1 2 3 4 5 6 7 |
db.createUser( { user: "yourusername", pwd: "yourpassword", roles: [ { role: "userAdminAnyDatabase", db: "admin" }, "readWriteAnyDatabase" ] } ) |
|
1 2 3 4 5 6 7 8 9 10 11 12 13 14 15 16 17 18 19 |
version: '3.7' services: mongodb: image: mongo:latest container_name: mongodb restart: always environment: - MONGO_INITDB_ROOT_USERNAME=root - MONGO_INITDB_ROOT_PASSWORD=rootPassword ports: - 27017:27017 volumes: # maps our mongo-init.js to a path inside the container image. docker-entrypoint.sh will execute this file # during container initialization. - ./mongo-init.js:/docker-entrypoint-initdb.d/mongo-init.js:ro # maps the directory ot which we mounted the EBS volume to /data/db, the default data directory # used by mongo - /mongo-data:/data/db |
Note that we set the MONGO_INITDB_ROOT_USERNAME and MONGO_INITDB_ROOT_PASSWORD environment variables in the docker-compose.yml and also map the /mongo-data directory to which we mapped our EBS volume to /data/db, the default data directory used by mongo. Now, Mongo will use our attached EBS volume to store its data! If you want to migrate your data, all you need to do is to detach the volume and attach it to another instance.
To make things simple, I zipped up the four files – mongo-init.js, docker-compose.yml, Dockerfile (to install and run Mongo) and docker-entrypoint.sh and placed the zip on a AWS S3 bucket. I then use AWS CLI to copy the file to the EC2 instance and run docker-compose. Remember we attached the AmazonS3FullAccess policy to the IAM role we launched our instance in? Now you see why that was necessary.
The bash script to carry out all these steps is shown below. It copies the zip file from S3, unzips it, installs docker and docker-compose and runs the docker-compose.yml file. You can append the content at the end of the previous script and run it as a single script.
|
1 2 3 4 5 6 7 8 9 10 11 12 13 14 15 16 17 18 19 20 21 22 23 24 25 26 27 28 29 30 31 |
# copy mongo docker files aws2 s3 cp s3://mongo-docker-install/mongo-docker-install.zip ./ # unzip unzip mongo-docker-install.zip # install docker sudo apt-get install \ apt-transport-https \ ca-certificates \ curl \ software-properties-common curl -fsSL https://download.docker.com/linux/ubuntu/gpg | sudo apt-key add - sudo add-apt-repository \ "deb [arch=amd64] https://download.docker.com/linux/ubuntu \ $(lsb_release -cs) \ stable" sudo apt-get update sudo apt-get --assume-yes install docker-ce # add user to docker group and adjust permissions so we can run docker without sudo. # see: https://www.digitalocean.com/community/questions/how-to-fix-docker-got-permission-denied-while-trying-to-connect-to-the-docker-daemon-socket sudo usermod -aG docker $USER sudo chmod 666 /var/run/docker.sock # install docker compose: sudo curl -L "https://github.com/docker/compose/releases/download/1.25.0/docker-compose-$(uname -s)-$(uname -m)" -o /usr/local/bin/docker-compose sudo chmod +x /usr/local/bin/docker-compose # Run the docker container docker-compose up --build -d mongodb |
That’s it! Your client should now be able to authenticate using the username/password specified in the mongo-init.js and connect to your MongoDB database. The easiest way to test this is using the MongoDB Compass application. Hope you found the info helpful. Please leave a comment if you did.
Thanks a lot for this! A few notes (hope this all makes sense):
The volume was already attached by the instance setup process – there’s a place to do that. It was named /dev/sdb and all I had to do was initialize the fs, create a mount point and mount.
The docker install process for Amazon Linux 2 instances appears to be different as well (https://docs.aws.amazon.com/AmazonECS/latest/developerguide/ecs-agent-install.html).
Specifically:
# Different
# install docker
sudo amazon-linux-extras install -y ecs; sudo systemctl enable –now ecs
#Ensure that the agent is running
curl -s http://localhost:51678/v1/metadata | python -mjson.tool
# Similar
sudo usermod -aG docker $USER
sudo chkconfig docker on
# Same
# install docker compose:
sudo curl -L “https://github.com/docker/compose/releases/download/1.25.0/docker-compose-$(uname -s)-$(uname -m)” -o /usr/local/bin/docker-compose
sudo chmod +x /usr/local/bin/docker-compose
# Run the docker container
docker-compose up –build -d mongodb