

This post shows how to set up a local Ray cluster consisting of several Ubuntu workstations connected over a home WiFi network and running a Directed Acyclic Graph (DAG) of computations on this cluster. The DAG comprises loading a CSV file from AWS S3, performing simple data transformations steps, training a RandomForest classifier, running various implementations of KernelSHAP, an interpretability algorithm on the predictions of the RandomForest model and comparing the results. This DAG is simple enough to follow along easily, but shows the essential elements of real DAGs encountered in practice.
You will also learn how to use the Ray dashboard to visualize your cluster and performance impact of adding additional worker processes on the master and worker nodes.
In later posts, I’ll cover running this system on the cloud, eg., on a cluster of AWS EC2 nodes.
I will not be going into the details of Ray. See this whitepaper for an introduction to Ray’s system architecture and programming concepts. I will also not be going into details on Shapley values and KernelSHAP (an algorithm used to calculate Shapley values). Very briefly, SHAP (SHapley Additive exPlanations) is a class of interpretability/explanability algorithms used to explain a Machine Learning (ML) model’s predictions; for example, by assigning scores to the predictor variables of a ML model which reflect the importance of each variable in making a certain prediction. I refer you to this book for learning more about interpretability in ML and my earlier post about the KernelSHAP algorithm.
The topics I will cover in this post are:
- Creating the base Ray docker image and adding application source, data and dependencies to the base image
- Running Ray on the master and worker nodes using these docker images
- Copying application data and source from the master to the worker nodes
- Retrieving temporary AWS STS credentials and passing them to the docker container using the -env-file option
All the code for this project is here.
Dataset and model
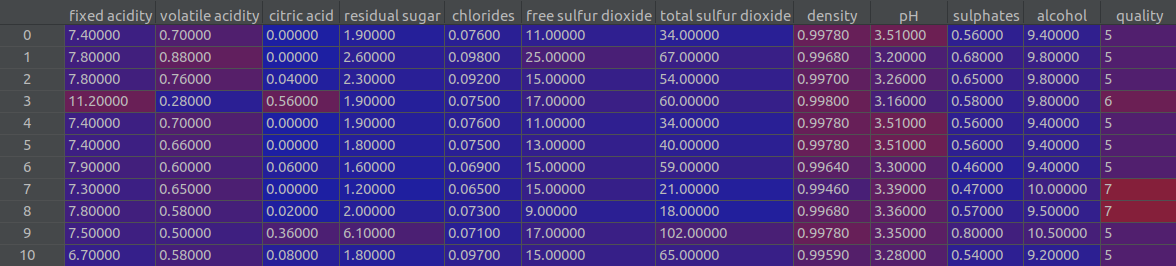
The dataset we’ll use is the wine quality dataset. This dataset consists of 12 columns. The first 11 are characteristics of wine and the last column is a wine quality indicator. We’ll split the dataset into train and test subsets and train a Random Forest model on the training set. Then we’ll use the trained model to make wine quality predictions on the test subset and calculate Shap values for each prediction using different implementations of the KernelSHAP algorithm. These Shap values indicate the importance of each predictor variable in arriving at a certain prediction.
The first few rows of the dataset are shown below.
Application structure
The application is structured as shown below.
- source/: python source files for my implementation of KernelSHAP algorithm
- ray_source/build_ray_docker_images.sh: This shell script clones the Ray repo and builds the ray docker image. We’ll use this image as the base to add application code and data. This is a one time step.
- setup_docker.sh: shell script for building and running application docker images, copying application source and data to the worker nodes and setting up temporary AWS credentials to access S3. These steps are described in more detail below
- copy_data.sh: shell script to copy application source, data, Dockerfile etc., from master to each worker node
- get_session_creds.sh: shell script to retrieve temporary credentials to assume the role specified in iamroles.txt and writing the credentials to env.list text file. This file is passed to the docker container using the -env-file option in docker run command where they are available to any application running in the container as environment variables.
Application DAG
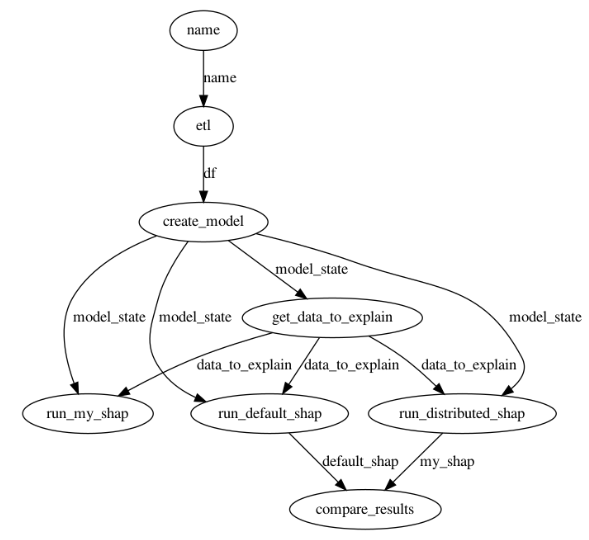
The figure below shows the application DAG. The main tasks in the DAG are:
- ETL: read winequality-red.csv file from local disk or from S3
- create_model: splitting the data into training and testing subsets and training a Random Forest model on the training data. The trained model and the train/test splits are used to create a model_state dictionary which is passed to downstream tasks
- get_data_to_explain: returns the first
 (user configurable input) rows of the test data. Shapley values are calculated for model predictions on these rows.
 - run_distributed_shap and run_default_shap: these tasks run my distributed implementation and default Python shap implementation of the KernelShap algorithm respectively
- compare_results: compares the output of the two implementations and returns a bool indicating whether the outputs match or not
The code below shows how the DAG shown above is created in Python.
|
1 2 3 4 5 6 7 8 9 10 11 12 13 14 15 16 17 18 19 20 21 22 |
# Train randomforest model model_state = create_model.remote(df) # get data to explain: returns test dataframe rows from start to end index data_to_explain = get_data_to_explain.remote(model_state, 0, args.num_rows) # Run my serial (non-distributed) implementation of shap my_shap = run_my_shap.remote(model_state, data_to_explain) # Run the distributed version my_shap_distributed = run_distributed_shap.remote(model_state, data_to_explain) # Run the default shap python library implementation default_shap = run_default_shap.remote(model_state, data_to_explain) # compare results of the distributed version with the default python implementation match = compare_results.remote(default_shap, my_shap_distributed) start = time.time() print("Starting DAG execution") res = ray.get(match) print("Finished DAG execution") end = time.time() if res is True: print("Results match!") else: print("Results don't match!") |
Running the application
Clone the application repo and run python source/kernel_shap_test_ray.py. You’ll need to have Ray and Python packages listed in requirements.txt installed on your computer. By default, the application sets up a local Ray cluster using 6 CPUs and runs the DAG on this cluster. The cluster is automatically torn down at exit.
By default, Ray will parallelize its workload and run tasks on multiple processes and multiple nodes. If you want to debug (eg., set breakpoints in Pycharm), set use_local_mode=1. Doing so initializes Ray with local_mode=True. This forces all Ray functions to occur on a single process.
|
1 |
python source/kernel_shap_test_ray.py --use_local_mode=1 |
Be default, the input data file (winequality-red.csv) is read from the disk. Later, I’ll show how to read this file from a S3 bucket.
To run kernel_shap_test_ray.py on an existing cluster, set local=0.
|
1 |
python source/kernel_shap_test_ray.py --local=0 |
To set up a distributed cluster, we need to build a docker container image consisting of Ray and our application source and data and then run Ray from this container. Below, I’ll show how to set this up.
Building the docker image
Ray requires the same Python environment on the master and worker nodes. The easiest way to ensure this is to build a docker container for your application on the master and worker nodes and run Ray from within this container. The code below shows how this is done on the master node. The logic is the same for the worker nodes. Note that container images are built and run independently on the master and worker nodes and thus application code and data must be copied to each worker node. Alternatively, you could build the docker image on the master and publish to a container repository such as Dockerhub. The worker nodes can then pull the image from the container repository. You can also push your application source and data to a version control system (such as Github) and have the workers pull from the repo.
|
1 2 3 4 5 6 7 8 9 10 11 12 13 14 15 16 17 18 19 20 21 22 23 24 25 26 |
update_master_node() { # Master node NUM_CPUS=$1 PORT=$2 IMAGE_NAME=$3 CONTAINER_NAME=$4 ROOT_DIR=$5 # Build Docker image docker build -t $IMAGE_NAME:latest --target shap-image . # stop running containers with name CONTAINER_NAME docker ps --filter "name=$CONTAINER_NAME" -aq | xargs docker stop | xargs docker rm # First run our docker container based on the image we just created, then run Ray on it. Must be # done in this sequence for this to work.. # -itd runs the container in interactive mode in the background # --rm removes the container when it is stopped # --network=host lets workers connect to ray master using the master machine's IP # /bin/bash lets the container running so we can run exec commands docker run -itd --rm --name=$CONTAINER_NAME --shm-size=2G -v $ROOT_DIR/source:/app/source --network=host --env-file ./env.list $IMAGE_NAME /bin/bash # -f option forcibly stops ray processes ray stop -f docker exec $CONTAINER_NAME \ ray start --head --num-cpus=$NUM_CPUS --redis-password="password" --port=$PORT } |
Note the use of docker volume mapping in the docker run command. By mapping the application source directory, you can make changes to your driver program without building the docker container.
To build the application docker image and run Ray on the workers, create a workers.txt file containing the IP addresses of your worker nodes. You must also create a SSH keypair and copy the public key to the workers so that the script can ssh into the workers and run commands. Here’s a great article that shows how to set this up.
The code to read the worker IP addresses, ssh into each worker node and call update_worker_node is shown below. The logic is hopefully easy to follow.
|
1 2 3 4 5 6 7 8 9 10 11 |
# step 3: attach worker nodes to master. Worker IPs are specified in workers.txt while IFS= read -r line do echo "$line" worker_ip=$line # This line opens a SSH connection with each worker and calls update_worker_node with the arguments provided on the worker node ssh ankur@$worker_ip -i $SSH_KEY_LOCATION "$(typeset -f update_worker_node); \ update_worker_node $NUM_CPUS_WORKERS $PORT $master_node_address $IMAGE_NAME $CONTAINER_NAME $ROOT_DIR" done < "$input" |
If you don’t have worker nodes and just want to set up a Ray cluster on your main computer, simply create an empty workers.txt file.
Once your cluster is set up, run:
|
1 |
docker exec myshap python source/kernel_shap_test_ray.py --local=0 |
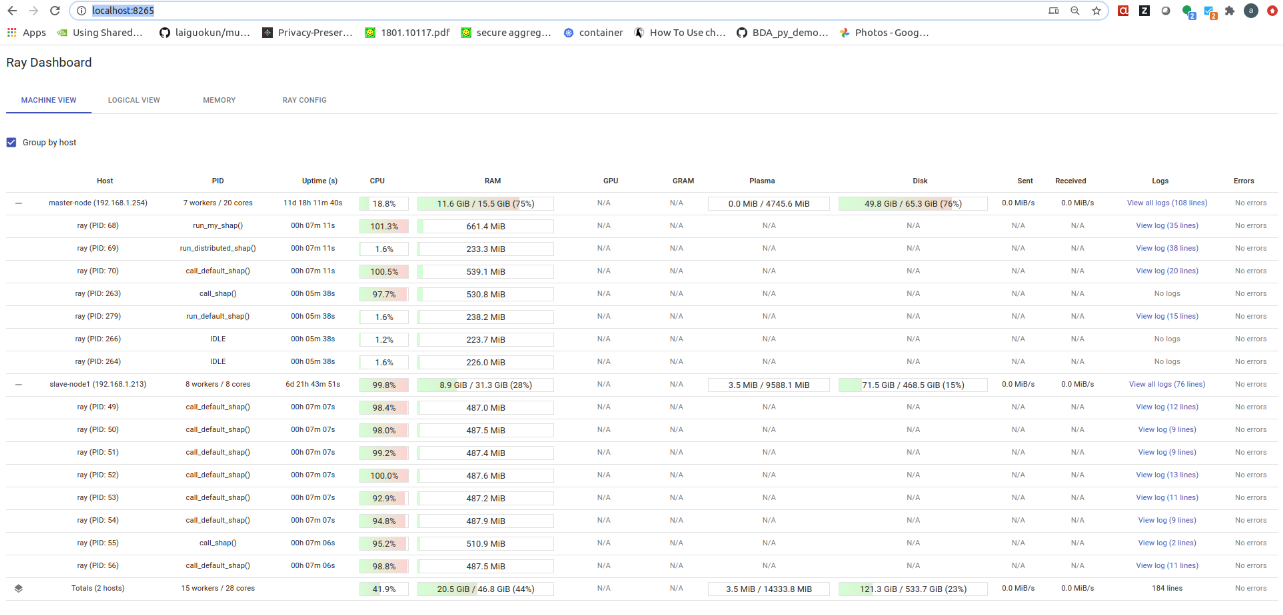
You can monitor the progress of your DAG execution using the Ray dashboard (the port may be different in your case). As you can see, 3 processes on the master node and 8 processes on the worker node are being used. These values correspond to the NUM_CPUS and NUM_CPUS_WORKERS variables in the setup_docker.sh script.
Execution times
The table below shows the execution time with increasing number of CPUs.
| Number of workers | Total DAG execution time (sec) | Default SHAP execution time (sec) | My SHAP execution time (sec) |
|---|---|---|---|
| 2 | 71.44 | 68.9 | 35.15 |
| 4 | 39.37 | 37.85 | 30.59 |
| 6 | 27.76 | 26.35 | 20.20 |
| 8 | 26.93 | 25.51 | 17.61 |
| 10 | 17.69 | 16.32 | 15.48 |
| 12 | 19.21 | 18.85 | 14.12 |
From this table, we can make the following observations.
- Total DAG execution time is only slightly higher than the execution time of the longest task, default Python SHAP, indicating that independent tasks are executing in parallel.
- Execution time decreases as the number of CPUs available to Ray is increased, indicating per-task parallelization is being utilized as well (see code below).
- There is a big drop in execution time when number of CPUs is increased from 8 to 10. This happens because the execution of default SHAP is split into 8 chunks and enough workers are now available to process all 8 chunks in parallel
- No improvement in obtained upon increasing the number of CPUs to 12. At this point, all available parallelization has been utilized.
|
1 2 3 4 5 6 7 8 9 10 11 12 13 14 15 16 17 18 19 20 21 22 |
def run_default_shap_impl(model_state, data_to_explain, num_workers=8): model = model_state['model'] X_train = model_state['X_train'] explainer = shap.KernelExplainer(model.predict, X_train) if isinstance(data_to_explain, pd.DataFrame): data_to_explain = data_to_explain.values # splitting the data to explain into chunks which can be processed in parallel instance_chunks = np.array_split(data_to_explain, min(num_workers, len(data_to_explain)), axis=0) num_splits = len(instance_chunks) futures = [] for i in range(0, num_splits): print("Submitting:", i) future = call_default_shap.remote(explainer, instance_chunks[i]) futures.append(future) shap_vals = [] for future in futures: result = ray.get(future) for s in result: shap_vals.append(s) return np.array(shap_vals) |
Reading data from S3
You may have noticed that the copy_data script copies the winequality-red.csv file to the worker nodes. This must be done because we don’t have control over which node the ETL task will run and thus all nodes must have a copy of the application data. A better way to manage data is to upload application data to the cloud and provide the credentials necessary to access this data to the master and worker processes.
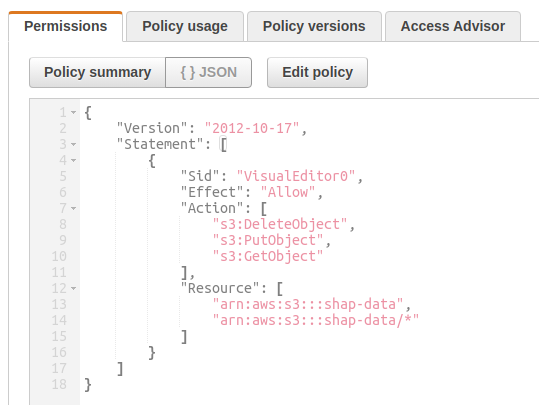
I pushed the winequality-red.csv to a S3 bucket named my-shap and then created a bucket access policy that allows Get/Put/DeleteObject operations on this bucket.
I then created an IAM role and attached this policy to that role. I also added my dev user profile as a trusted relationship in the role. Now my dev profile can assume this IAM role to get temporary STS credentials which can be used to make Boto calls to access the contents of the S3 bucket. If you are unfamiliar with these concepts, I encourage you to search for AWS IAM and read about Policies, Roles, Trust Relationships and other Identity and Access Management (IAM) concepts.
The diagram below shows how the IAM role and your AWS user profile credentials are used to get temporary access credentials and passed to the application docker container as environment variables.
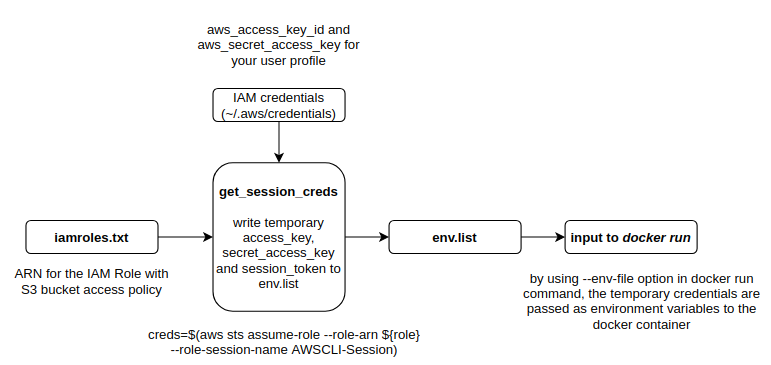
To read data from S3, you should create an iamroles.txt file in the project root folder and populate it with the IAM role ARN. Now when you run setup_docker.sh shell script, it should create an env.list file with the temporary credentials that will be passed to the docker container as environment variables. Any application running in the container can then make Boto calls using these credentials. To read the csv file from S3, just set the use_s3 flag to 1 when running the kernel_shap_test_ray application.
|
1 |
docker exec myshap python source/kernel_shap_test_ray.py --local=0 --use_s3=1 |
Conclusion
To conclude, Ray appears to be a promising distributed computing framework that makes it possible to utilize both within-task and across-task parallelism by running a DAG on a distributed compute cluster. At a first glance, Ray offers more programmatic control than other similar systems such as DASK for running embarrassingly parallel workloads (which constitute the vast majority of use-cases encountered in practice) while also offering more advanced features such as stateful tasks that can share state with other tasks through a concept called Actors. Ray Serve also looks very intriguing. I’m looking forward to exploring further and learning more about what Ray can do!
I hope you found this post helpful. Please leave a comment if you did.
Leave a Reply